Your step by step guide to install and integrate the Gatsby JS form with Headlessforms.
1. Create a new form endpoint in Headlessforms
For Headlessforms to receive data from your Gatsby form, you’ll first have to create a new form endpoint in Headlessforms.
- Log into your Headlessforms account
- Click create new form button
- Stipulate a name
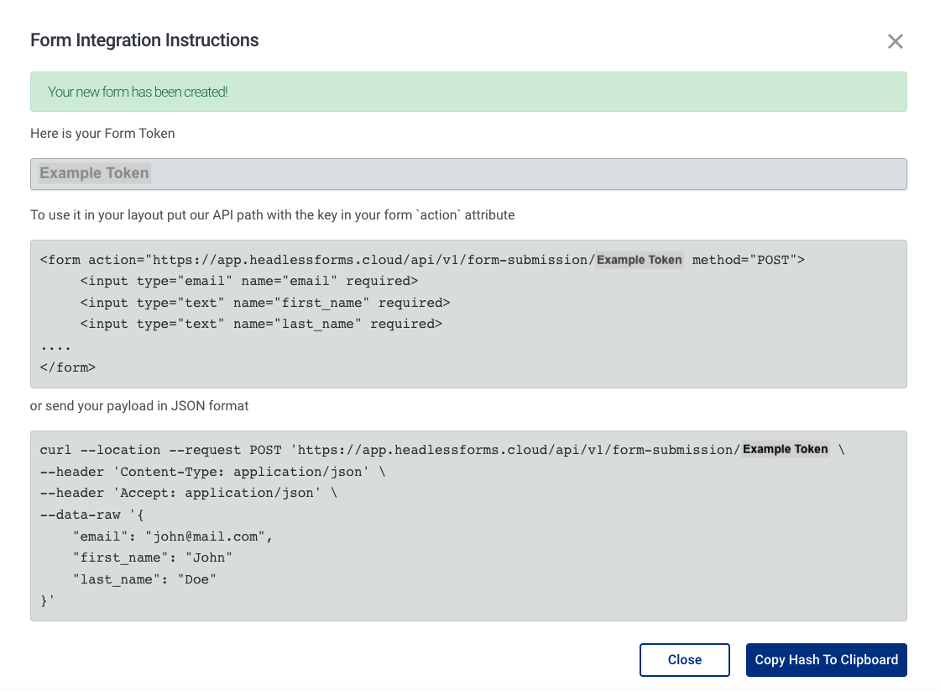
And headlessforms will now provide a form token unique to you to identify your Gatsby form.
2. Setting up your Gatsby Form
To create your HTML form, you will now use the code provided on Headlessforms.
This creates your standard, simple contact form, with fields for email address and name.
You also have the alternative of using JSON format to send your payload.
3. How to Create a Blank, New Gatsby Site
- First, check to see if you have the Gatsby CLI installed:
$ npm install -g gatsby-cli- Then, create a new gatsby-site using the following command:
$ gatsby new gatsby-site- Change directories into site folder and run the command:
$ gatsby developGatsby will now run a hot reloading environment. This will be available by default at localhost:8000
4. Adding the Contact Section to your Gatsby site
- First, you‘ll create a new file called contact.js under your src/pages directory
- Then you’ll have to change the content with the following code block:
import React, { useState }  from "react"
import axios from "axios";
import { Link } from "gatsby"
import Layout from "../components/layout"
const MyForm = () => {

    const [serverState, setServerState] = useState({
      submitting: false,
      status: null
    });
    const handleServerResponse = (ok, msg, form) => {
      setServerState({
        submitting: false,
        status: { ok, msg }
      });
      if (ok) {
        form.reset();
      }
    };
    const handleOnSubmit = e => {
      e.preventDefault();
      const form = e.target;
      setServerState({ submitting: true });
      axios({
        method: "post",
        url:"https://app.headlessforms.cloud/api/v1/form-submission/{form-token}",
        data: new FormData(form)
      })
        .then(r => {
          handleServerResponse(true, "Thanks!", form);
        })
        .catch(r => {
          handleServerResponse(false, r.response.data.error, form);
        });
    };
    return (
        <Layout>

    <div>
         <div className="col-md-8 mt-5">
            <h3>Headlessforms Gatsby Form Example</h3>
            <form onSubmit={handleOnSubmit}>
              <input type="email" name="email" placeholder="Your Email">
              <input type="text" name="name" placeholder="Your Name">
              <input type="text" name="message" placeholder="Your Message">
              <button type="submit">Send</button>
          </form>
        </div>
      </div>

  </Layout>

    );
  };

  export default MyForm;
Please Note:
It’s vital that you do not overlook changing the action attribute to a form endpoint URL with yours in your contact.js file.
5. Run Your Gatsby Site Locally in Order to Finalize Setup
Next, you should run the following command to access your Gatsby form at localhost:8000/contact/:
gatsby developIf you’ve followed these steps, your Gatsby site will now be running Headlessforms.
Thank you for reading! You can find more information and resources at Headlessforms Documentation.