
For something so intrinsic to any online business, it’s surprising how many organizations’ online web forms prove more of a barrier to commerce than a tool for maximizing it.
Badly designed forms which either don’t give you the information you need, are confusing or frustrating, or simply too long, can scare potential customers away. Online web forms are a major part of customer service provision, and bad customer service costs business $75 billion in 2018, according to Forbes and NewVoiceMedia.
On the other hand, a well-designed, attractive, and intuitive form can make a potential lead or client feel appreciated and well served.
In this article we’ll look at how you can use Headlessforms to your advantage and start building straightforward forms that drive growth. Here are ten simple tips to get you started.
1: Before you Start
Don’t jump straight in to designing your form. First make a list of all the information you need or want and prioritize them to create a logical flow. Don’t worry though: whilst you’re building your form using Headlessforms, you can still reorder and restructure it.
Notice that need and want are very different concepts – the first component is the data you require in order to communicate effectively with your users. Sometimes this is just a first name, surname, and an email address. “Wants” comprise those data that would prove helpful or insightful, but aren’t absolutely necessary. To preserve brevity, you may have to be sparing with your wants.
2: Getting Started
When you’re logged in, your dashboard will appear and it’s evident where to go next:

Just click on Create new form and you’re up and running. You’ll be asked to give your creation a name. Choose something memorable – it’ll be easier to find the right iteration and version later.
The next thing to do is the integrate the online web form into your site, so that it’s hosted properly. You’ll be given a Form Action (API Endpoint) and a Form Token:
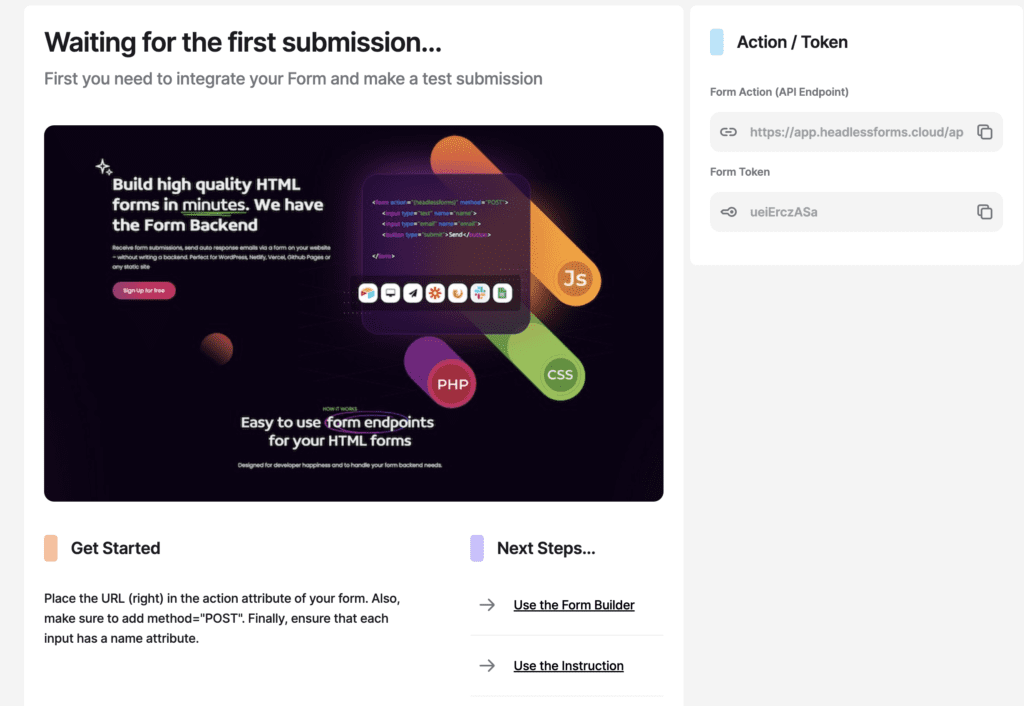
If you’re adapting an existing form, then copy and paste the Form action URL into the Form Action attribute of your HTML code. Make sure your method attribute is set to “POST”. If you are creating a brand-new form, add a form tag in HTML:
<form action="https://app.headlessforms.cloud/api/v1/form-submission/ueiErczASa" method="POST">
....
<button>Submit</button>
</form>
You can also use Curl, Zapier or Webhook to integrate Headlessforms with your site. Click on Use the Instruction on the same screen for more information.
3: Using the Online Web Form Builder
When you’re ready, click on Use the Form Builder to start designing your form.
There are two main tabs, General and Inputs:
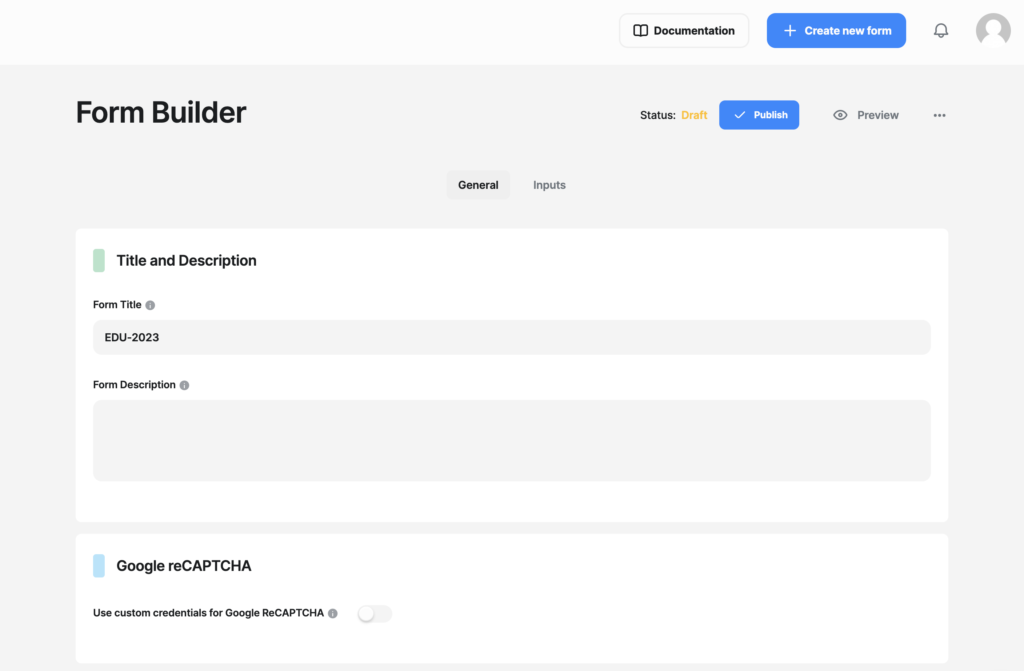
In the general tab you can add a description to help your site visitors understand what the form is for. You can also turn on Google reCAPTCHA for added identity authentication, which should help prevent bots from completing your forms.
On the top of the page, you’ll see the status of your form (draft or published). You’ll also be able to see a preview. Finally, the extended options (…) will allow you to export your form to HTML, import forms from HTML or delete your work.
The inputs tab is where the fun really begins. Use the drag-and-drop functions to add elements and order them.
4: Introduce your Form and Start with the Basics
It’s a good idea to begin with a bit of explanatory text, to reassure your potential customers that they’ve found the right place to communicate with your organization. As previously explained, use the “form description” field in the General tab before you begin designing your input fields.
All the elements work roughly the same way. For instance, if you want to request a short text string, such as a first name, simply drag “short text” into the box on the right-hand side of the screen and various options will appear:
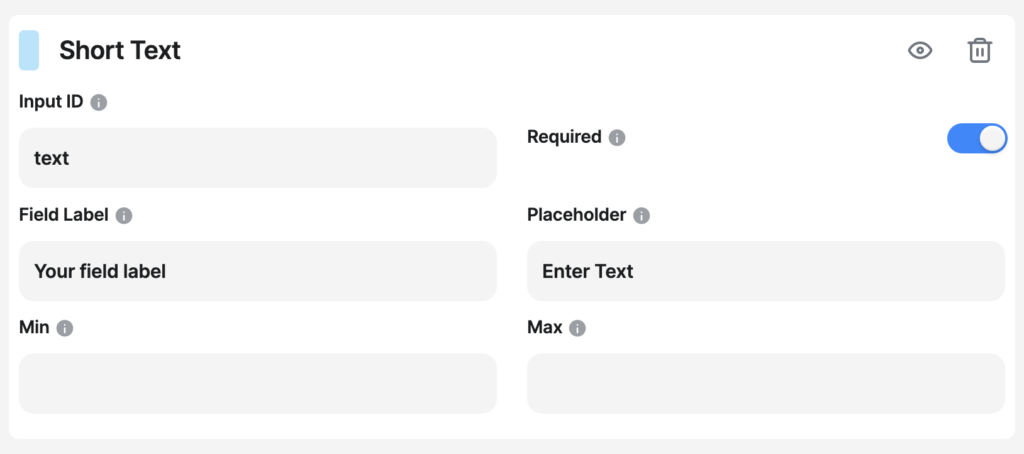
This is the element you’ll use to solicit any simple text response. Here’s what everything means:
- Input ID: The internal name you give this field (does not display to user)
- Required: use this slider to make the question mandatory (will be asterisked)
- Field Label: name of the field to be shown to the user
- Placeholder: temporary text in the field box to offer a prompt to the user
- Min: optional field to specify minimum character length (good for passwords)
- Max: optional field to specify maximum character length (ditto)
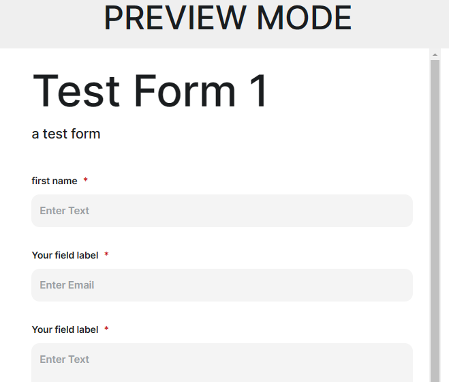
In the top right of each element box, you can preview the appearance of each element by shutting between the pencil and eye icons:

To create a longer text box (ideal for soliciting free text messages and other longer inputs) simply use the Long Text element. Number inputs can be solicited with the Number element – Headlessforms will ensure that only a numerical response is accepted.
5: Solicit complex responses with radio buttons, checkboxes, and dropdown lists.
There are three ways to use multiple choice questions to solicit a range of restricted responses:
- Radio Buttons: provide a list of options and allow users to select just one.
- Checkboxes: ask a question or offer an option the user can select or ignore.
- Dropdown Lists: offer a list of possible responses and allow user to highlight one.
All these elements are intuitive and simple to set up and can be previewed by clicking on the eye icon.
6: Reorder your form with drag and drop simplicity.
Worried that you’ve got the order wrong? That’s not a problem. Simply click on an element in your design and hold down your mouse button (or finger on the touchpad), then drag the elements into exactly the order you’d prefer.
It’s a good idea to set all elements to preview (eye icon) before you commit to publishing your form and click on Preview on the top right of the Form Builder. A new browser tab will open, in which you can see a preview of your form. Make sure all mandatory questions have a red asterisk assigned:
7: Check your form settings
When ready, click “Publish” then hit Settings to ensure your form is properly integrated.
Overview allows you to set an expiry date for your form token. This is useful for forms which need to end, such as special offers and competition entries.
Here you’ll be given a reminder of your unique form endpoint and the form tag you should use in your site’s HTML.
You can set a custom redirect here, so that after completing your form, users are redirected to a thank you message on your site or sent elsewhere.
Double Opt-In allows you to send a message back to anyone who has already submitted a response. Use this to prevent intentional, or unintentional, duplicate responses.
You can also set a Validation policy in settings:
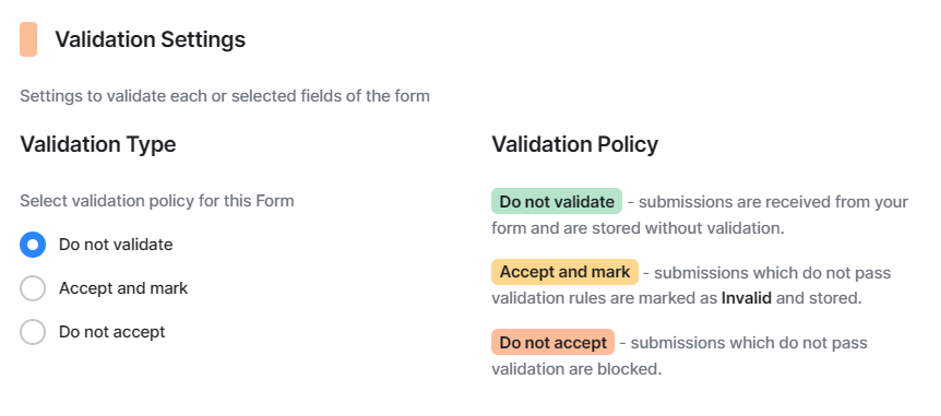
Headlessforms will validate form entries according to whichever policy you select.
8: Utilize file uploads
Form settings allow the ability to specify the maximum size and number of files users can upload. Use the sliders under Attachments to set these parameters.
Allowing for file uploads can be especially helpful for service desk queries, for instance, so that a customer can send a screenshot of whatever difficulty they are having with your product or site.
9: Test your form thoroughly
It’s important to test your form by running some trial inputs. Visit the URL where your form appears and test it several times. Use names or other indicators which allow you to identify which submissions are your tests. You can delete them before running any analytics.
Make sure you ask people unfamiliar with your process to complete the form. Ask them to try to “break” your form by inputting numbers where text is asked for, or over-filling text boxes, et cetera. Provided your form elements are correctly configured, Headlessforms should render it impossible for users to cause any input errors.
Ask testers for feedback on how easy and intuitive you form was to complete. Here are some questions you might ask:
- How long did it take to complete the form?
- Were there any mandatory questions you’d have preferred not to answer?
- Were there any questions you expected which were missing?
- Did every question make sense?
- Was the form sensibly ordered?
- Did you have any qualms in completing it?
- Did the thank you message please you?
10: Grant team access to your data
Headlessforms will collate your data and make it available in downloadable Excel spreadsheets. Visit your Team Settings to specify who has access to this information:

Upload an avatar image for your team or change its name and time zone so that teams can understand the time and date of each form response.
Add new team members by inputting their email addresses and clicking Invite. Headlessforms will send each team member an email, granting them access via a Get Started button.
You can see who has joined the team and a list of invitations still pending. It’s equally easy to delete team members too.
For more in-depth information on how to use Headlessforms, visit our documentation page.
We hope this quick rundown of how Headlessforms works has been helpful. We’ve built an intuitive, straightforward platform for quick form building and integration. Don’t waste any more time struggling with your website’s clunky form builder or trying to create one from scratch in HTML.
If you have any feedback or comment, just click on the live chat feature on the bottom right of your screen (speech bubble). Happy form creation!